SpringBoot學習筆記-單元測試(2)-JUnit
JUnit介紹
何謂JUnit?
- jUnit是java單元測試的必備工具
- 只要在方法上加入@Test,即可生成一個單元測試
JUnit與Spring Boot的關係
-
Spring Boot <=2.1
只能使用JUnit4
-
Spring Boot 2.2 2.3
可以使用JUnit4、JUint5。
-
Spring boot >=2.4
只能使用JUnit5
所以綜合上述,現階段會以Junit5作為主流,其中需要注意的是,Spring Boot如果在2.2以及2.3版本中,需要到pom.xml加上額外設定才能禁用JUint4。
在Spring Boot 2.2版本或2.3版本禁用JUnit4
如果需要在Spring Boot 2.2版本或2.3版本禁用JUnit4在pom.xml中,我們的程式碼其中有關測試單元的大致上會長這樣:
<dependency>
    <groupId>org.springframework.boot</groupId>
    <artifactId>spring-boot-starter-test</artifactId>
    <scope>test</scope>
</dependency>
我們只需新增下面這幾段程式碼即可禁用JUnit4,上面那段程式碼會變成這樣:
<dependency>
    <groupId>org.springframework.boot</groupId>
    <artifactId>spring-boot-starter-test</artifactId>
    <scope>test</scope>
    <exclusions>
        <exclusion>
            <groupId>org.junit.vintage</groupId>
            <artifactId>junit-vintage-engine</artifactId>
        </exclusion>
    </exclusions>
</dependency>
Junt5的用法
Junit5的用法
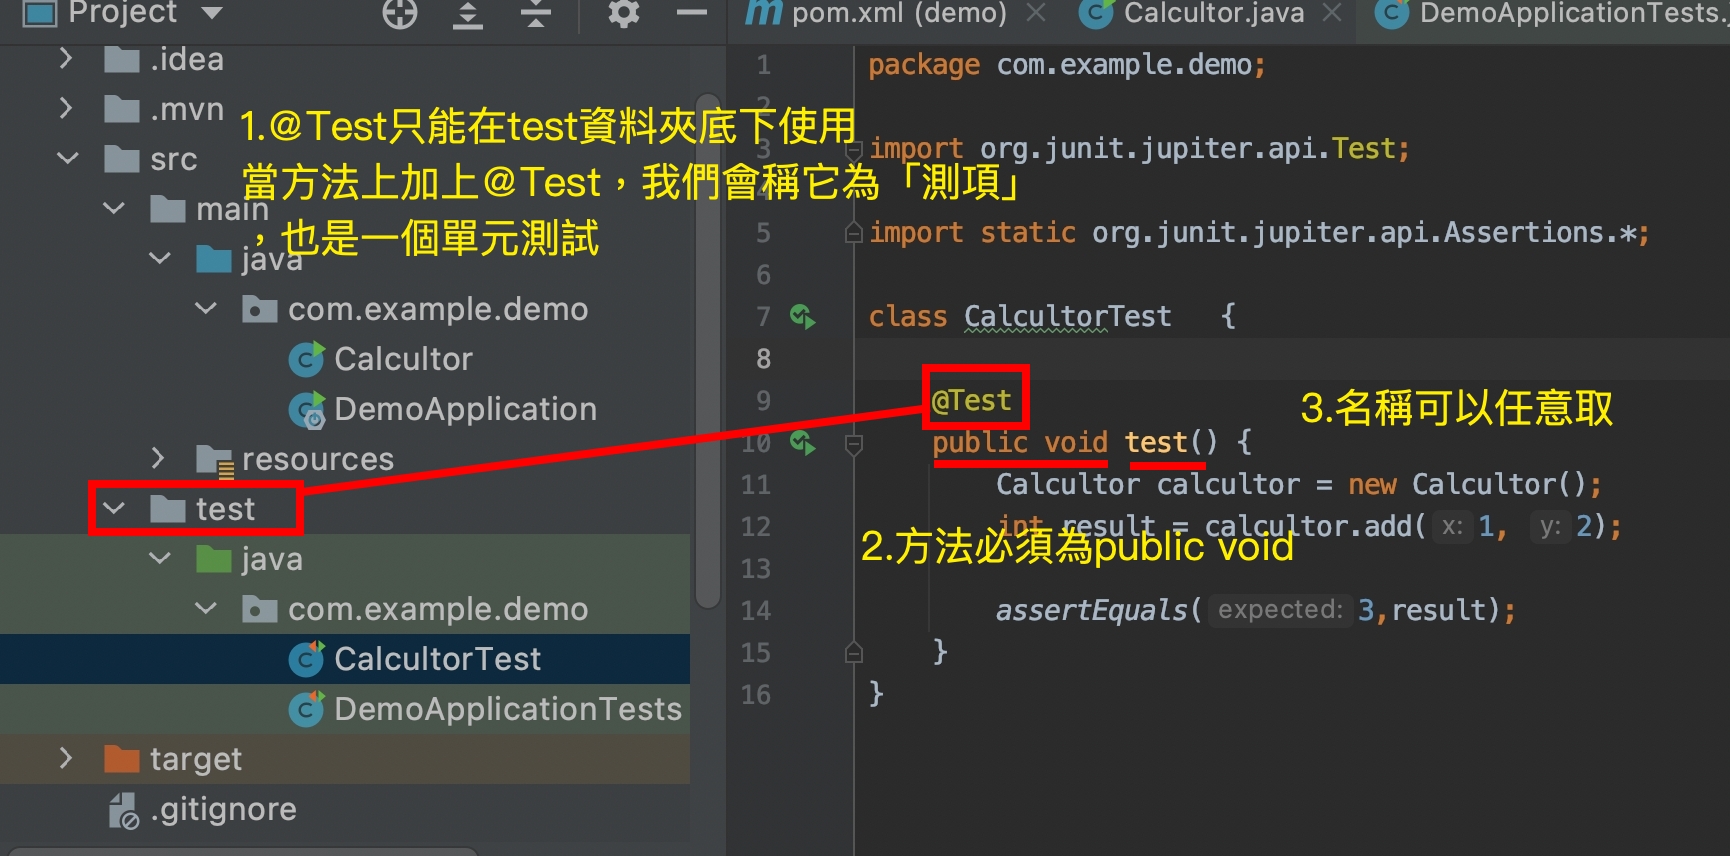
以圖片說明:
其中第三點看起來簡單,但正是最精華的所在處,因為如果要讓團隊或是別人看懂這個方法的作用,命名正是我們最重要的工作。
JUnit5 Assert
下面用表格來說明Assert斷言用法的主要用途
| Assert系列用法 | 用途 |
|---|---|
| assertNull(A) | 斷言A為Null |
| assertNotNull(A) | 斷言A不為Null |
| assertEquals(A,B) | 斷言A與B相等 |
| assertTure(A) | 斷言A為True |
| assertFalse(A) | 斷言A為False |
| assertThrows(exception,method) | 斷言執行method的時候,會噴出exception |
JUnit其他常用註解
@BeforceEach
@BeforceEach:在每次@Test開始之前,「都會」執行一次
@AfterEach
@AfterEach:在每次@Test結束之後,「都會」執行一次
範例:
class CalcultorTest   {

    @AfterEach
    public void after(){
        System.out.println("執行after");
    }

    @BeforeEach
    public void beforce(){
        System.out.println("執行beforce");
    }

    @Test
    public void test1() {
        System.out.println("執行test1");
    }

    @Test
    public void test2() {
        System.out.println("執行test2");
    }
}
執行結果:
/*-----------
執行beforce
執行test1
執行after
執行beforce
執行test2
執行after
------------*/
@BeforceAll
@BeforceAll:在所有@Test開始前執行一次
@AfterAll
@AfterAll:在所有@Test結束之後執行一次
在使用@AfterAll還有@BeforceAll的時候,必須是static才行,
也由於他們是static的原因,所以就不能去操做spring中的bean,所以比較少使用。
class CalcultorTest   {
    @AfterAll
    public static void afterall(){
        System.out.println("執行@AfterAll");
    }
    @BeforeAll
    public static void beforceall(){
        System.out.println("執行@BeforceAll");
    }

    @Test
    public void test1() {
        System.out.println("執行test1");
    }

    @Test
    public void test2() {
        System.out.println("執行test2");
    }
}
執行結果:
/*-----------
執行@BeforceAll
執行test1
執行test2
執行@AfterAll
-------------*/
@Disabled
Disabled:忽略該@Test不執行
@DisplayName
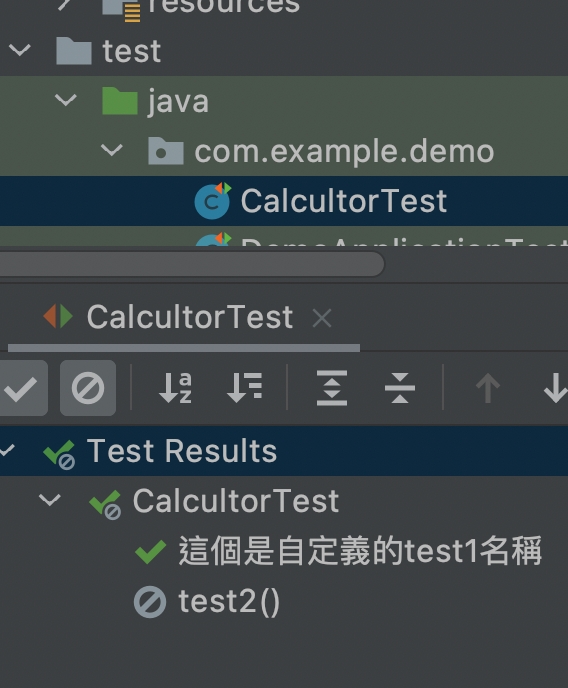
DisplayName:自定義顯示名稱
範例:
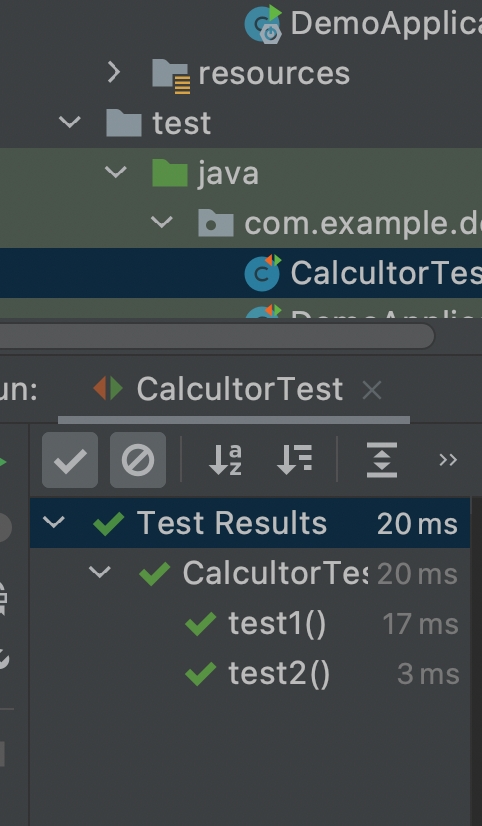
這是沒有使用註解狀況下的程式碼以及運行結果
程式碼:
@Test
public void test1() {
    System.out.println("執行test1");
}

@Test
public void test2() {
    System.out.println("執行test2");
}
運行結果:
程式碼:
@DisplayName("這個是自定義的test1名稱")
@Test
public void test1() {
    System.out.println("執行test1");
}

@Disabled
@Test
public void test2() {
    System.out.println("執行test2");
}
運行結果:


