SpringBoot學習筆記-單元測試(3)-Controller層、Dao層、Service層的測試方式,MockMvc使用詳解
Dao層以及Service層的測試方式
使用JUnit5測試SpringBoot程式
@SpringBootTest註解
- 只要在測試用的class上面加上@SpringBootTest,就會在單元測試時啟動Spring容器,也會創建Bean出來
- 這個@SpringBootTest的註解的功能非常完善,除了創建Bean之外,@Configuration或是攔截器Interceptor都會被生效,也就是等同於運行SpringBoot程式。
- 通常會把測試用的class變成public,
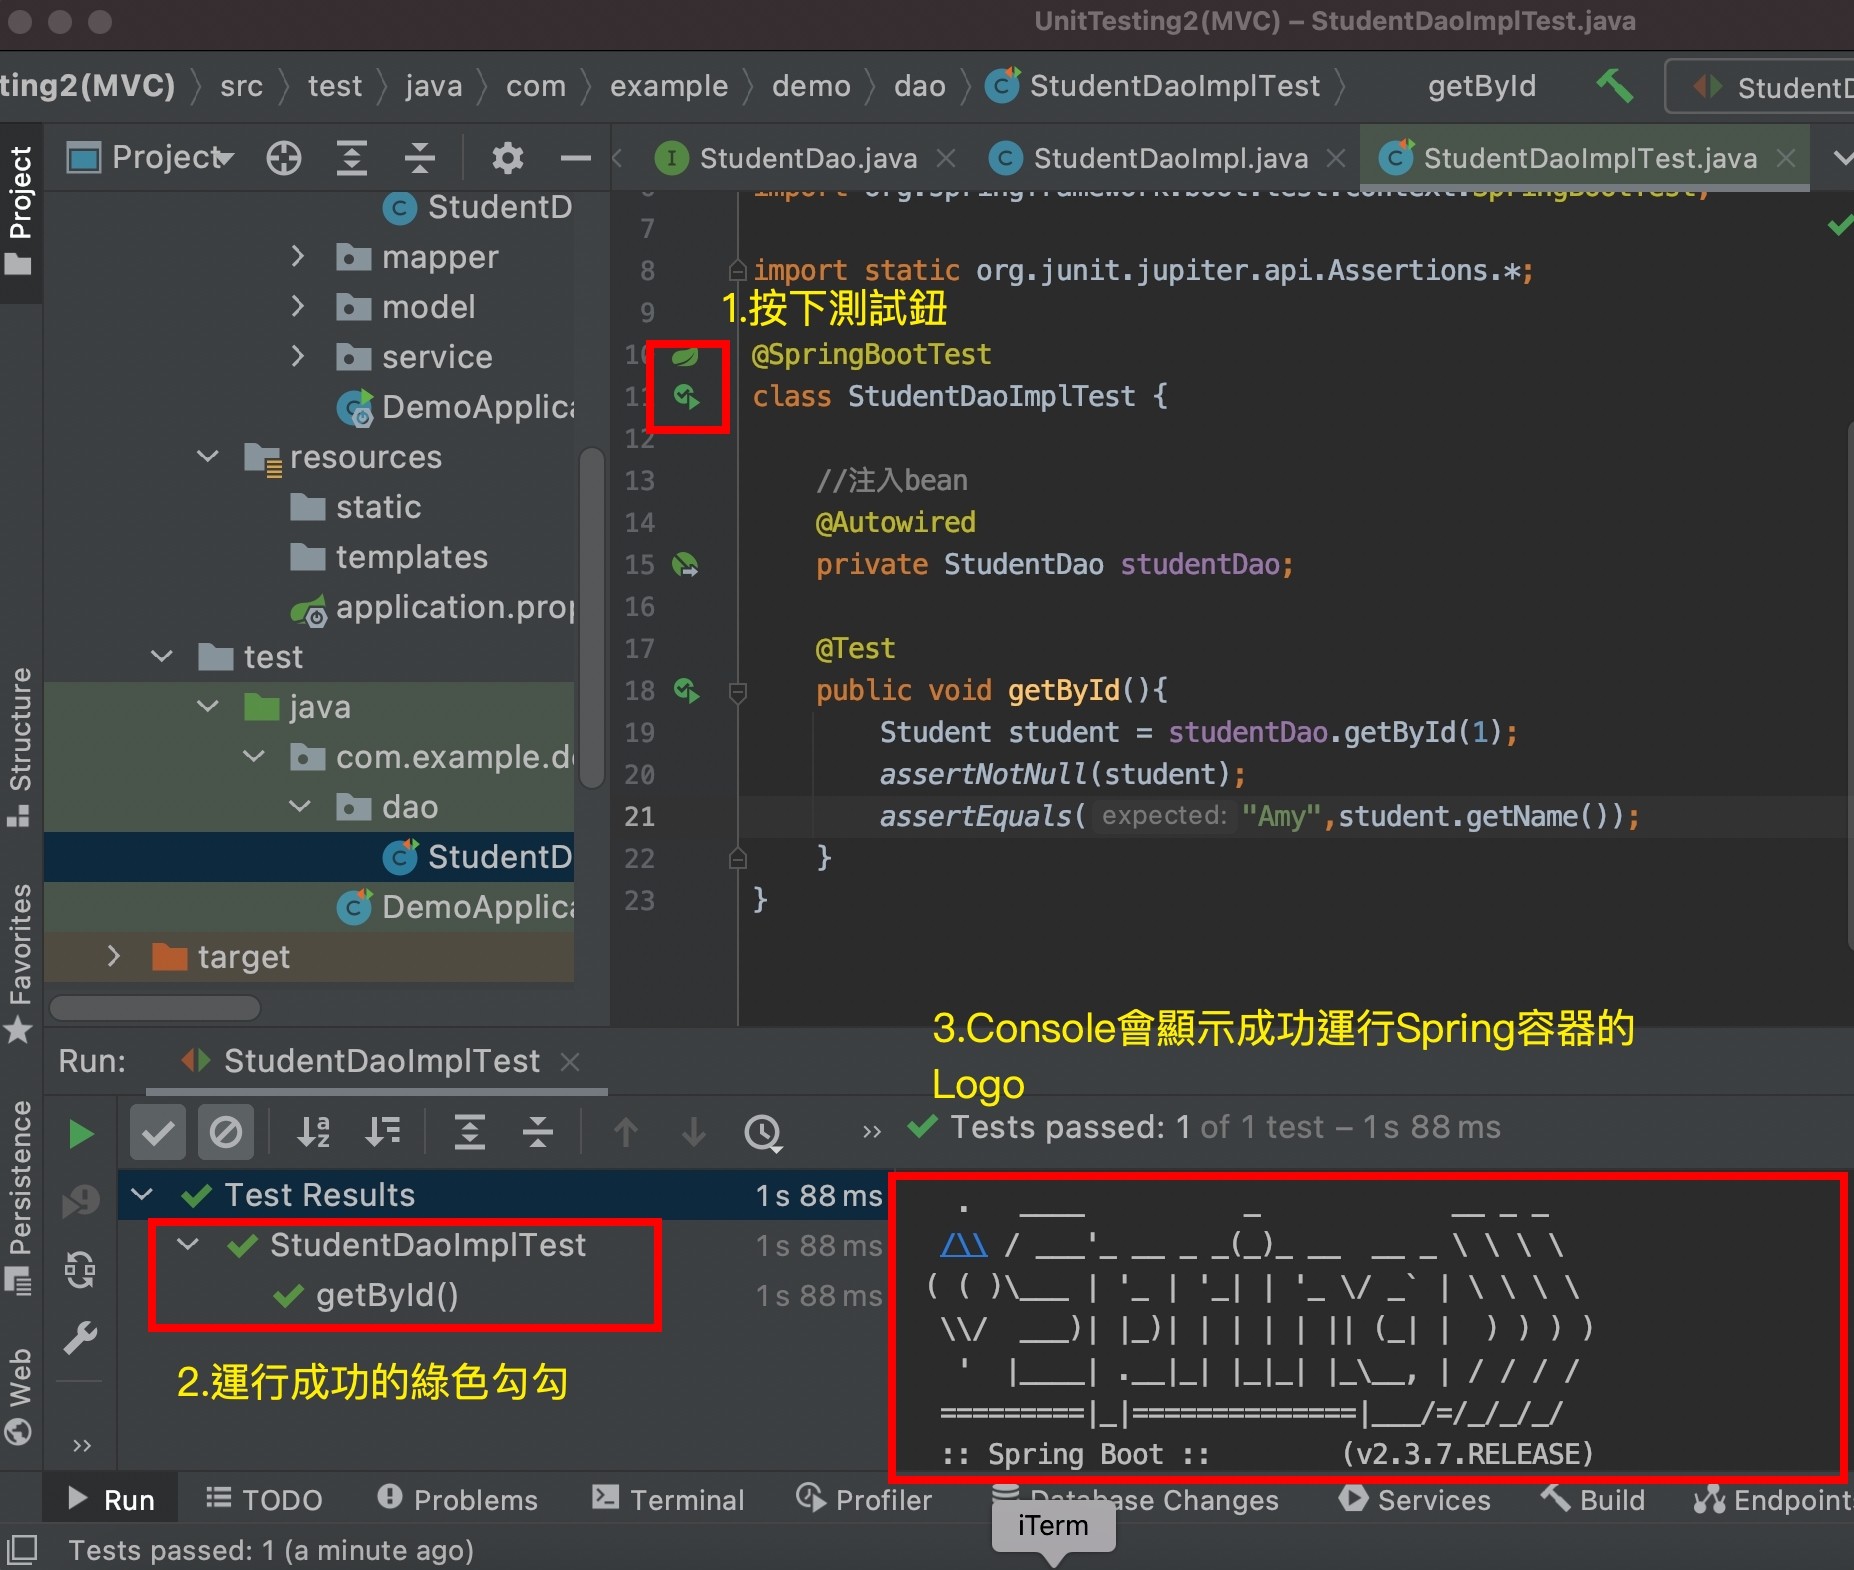
做好了準備之後可以運行看看成效以及顯示的結果為何:
@SpringBootTest
public class StudentDaoImplTest {

    //注入bean
    @Autowired
    private StudentDao studentDao;

    @Test
    public void getById(){
        Student student = studentDao.getById(1);
        assertNotNull(student);
        assertEquals("Amy",student.getName());
    }
}
運行成果:
@Transactional註解
假設今天我們透過@Test想測試deleteById的方法時,實際上是會去真實刪除資料庫裡面的數據的,所以如果先執行了測試deleteById,在執行測試getById,這時候如果Id是一樣的情況下,就會影響到測試結果,雖然可以透過測試不同的Id來避免此情況,但在越複雜的專案時此方法很不適合,所以我們可以透過加上@Transactional註解,在單元測試結束之後,SpringBoot會去rollback(回滾)這個單元測試裡面所有的資料庫操作。
使用範例:
@Transactional
@Test
public void deleteById(){
    studentDao.deleteById(1);
    Student student =studentDao.getById(1);
    assertNull(student);
}
不同的@Transactional註解
@Transactional在不同的資料夾下,有不同的差異,
| 資料夾 | @Transactional公用 |
|---|---|
| main資料夾 | 程式運行中發生錯誤才進行rollback |
| test資料夾 | 單元測試結束之後,強制執行rollback |
Controller層的測試
Controller層的測試目的在於,要模擬前端呼叫真實API CAll的行為,看API是否能運行正確,並且不能透過注入Bean的方式來測試,意思就是模擬http request
MockMvc
MockMvc的用途在於模擬真實的API call,
所以除了在測試用的class上面加上@SpringBootTest之外,要另外加上註解@AutoConfigureMockMvc這個註解,再注入MockMvc這項Bean。
MockMvc使用範例、MockMvc使用詳解
這邊附上Controller層程式碼:
@RestController
public class StudentController {

    @Autowired
    private StudentService studentService;

    @PostMapping("/students")
    public ResponseEntity<Student> create(@RequestBody Student student) {

        Integer studentId = studentService.insert(student);

        Student newStudent = studentService.getById(studentId);

        return ResponseEntity.status(HttpStatus.CREATED).body(newStudent);
    }

    @PutMapping("/students/{studentId}")
    public ResponseEntity<?> update(@PathVariable Integer studentId,
                                    @RequestBody Student student) {

        student.setId(studentId);
        studentService.update(student);

        return ResponseEntity.status(HttpStatus.OK).build();
    }

    @DeleteMapping("/students/{studentId}")
    public ResponseEntity<?> delete(@PathVariable Integer studentId) {

        studentService.deleteById(studentId);

        return ResponseEntity.status(HttpStatus.NO_CONTENT).build();
    }

    @GetMapping("/students/{studentId}")
    public ResponseEntity<Student> read(@PathVariable Integer studentId) {

        Student student = studentService.getById(studentId);

        return ResponseEntity.status(HttpStatus.OK).body(student);
    }
}
再來是Test資料夾底下的StudentDaoImplTest程式碼
//步驟一,把class變成public,並且創建相關的註解
@SpringBootTest
@AutoConfigureMockMvc
public class StudentControllerTest {

    //步驟二,注入Bean
    @Autowired
    private MockMvc mockMvc;

    //步驟三,建立測試單元
    //在建立MockMvc的時候,主要會分成三個部分

    @Test
    //後面throws Exception是因為下面的perform會去噴出一個Exception,所以才需要在方法上thorw出來
    public void getById() throws Exception{
        /*
        第一個部分就是會去創建一個requestBuilder,
        requestBuilder他會決定要發起的http requst,url路徑
        甚至header,他其實就是一個APItester的概念
         */

        //RequestBuilder也使用了Builder設計模式
        RequestBuilder requestBuilder = MockMvcRequestBuilders
                .get("/students/3")
               //等同於 .get("/students/{studentId}",3);
                .header("headerName","headerValue")
                .queryParam("graduate","true");

        /*
        第二個部分就是mockMvc.perform()程式,
        他的用途就是在執行上面的requestBuilder
        這個方法就等同於在APItester按下send
         */
        mockMvc.perform(requestBuilder)
                /*
                第三個部分就是在perform後面的程式,
                andExpect這個方法就是用來驗證結果,
                很像assert的概念,主要有
                andDo()、andExpect、andReturn
                來輸出、驗證、取得結果
                 */
                .andExpect(MockMvcResultMatchers.status().is(200));
    }

}
執行後如果驗證正確的話,就會看到成功的畫面,也完成了透過MockMvc去完成測試
MockMvc常用寫法
設計者模式(Builder)
Perform方法寫法,以及所謂的Builder設計模式,這個模式的核心概念就是可以無限「.」下去
範例:
mockMvc.perform(requestBuilder)
  	.andExpect(MockMvcResultMatchers.status().is(200))
  	.andExpect()
  	.andExpect()
驗證Json格式資料-jsonPath方法
如果要驗證Json格式資料的話,我們就需要用jsonPath方法,
在jsonPath方法裡第一個參數就是想要取得json object的key,第二個則是要驗證的方式。
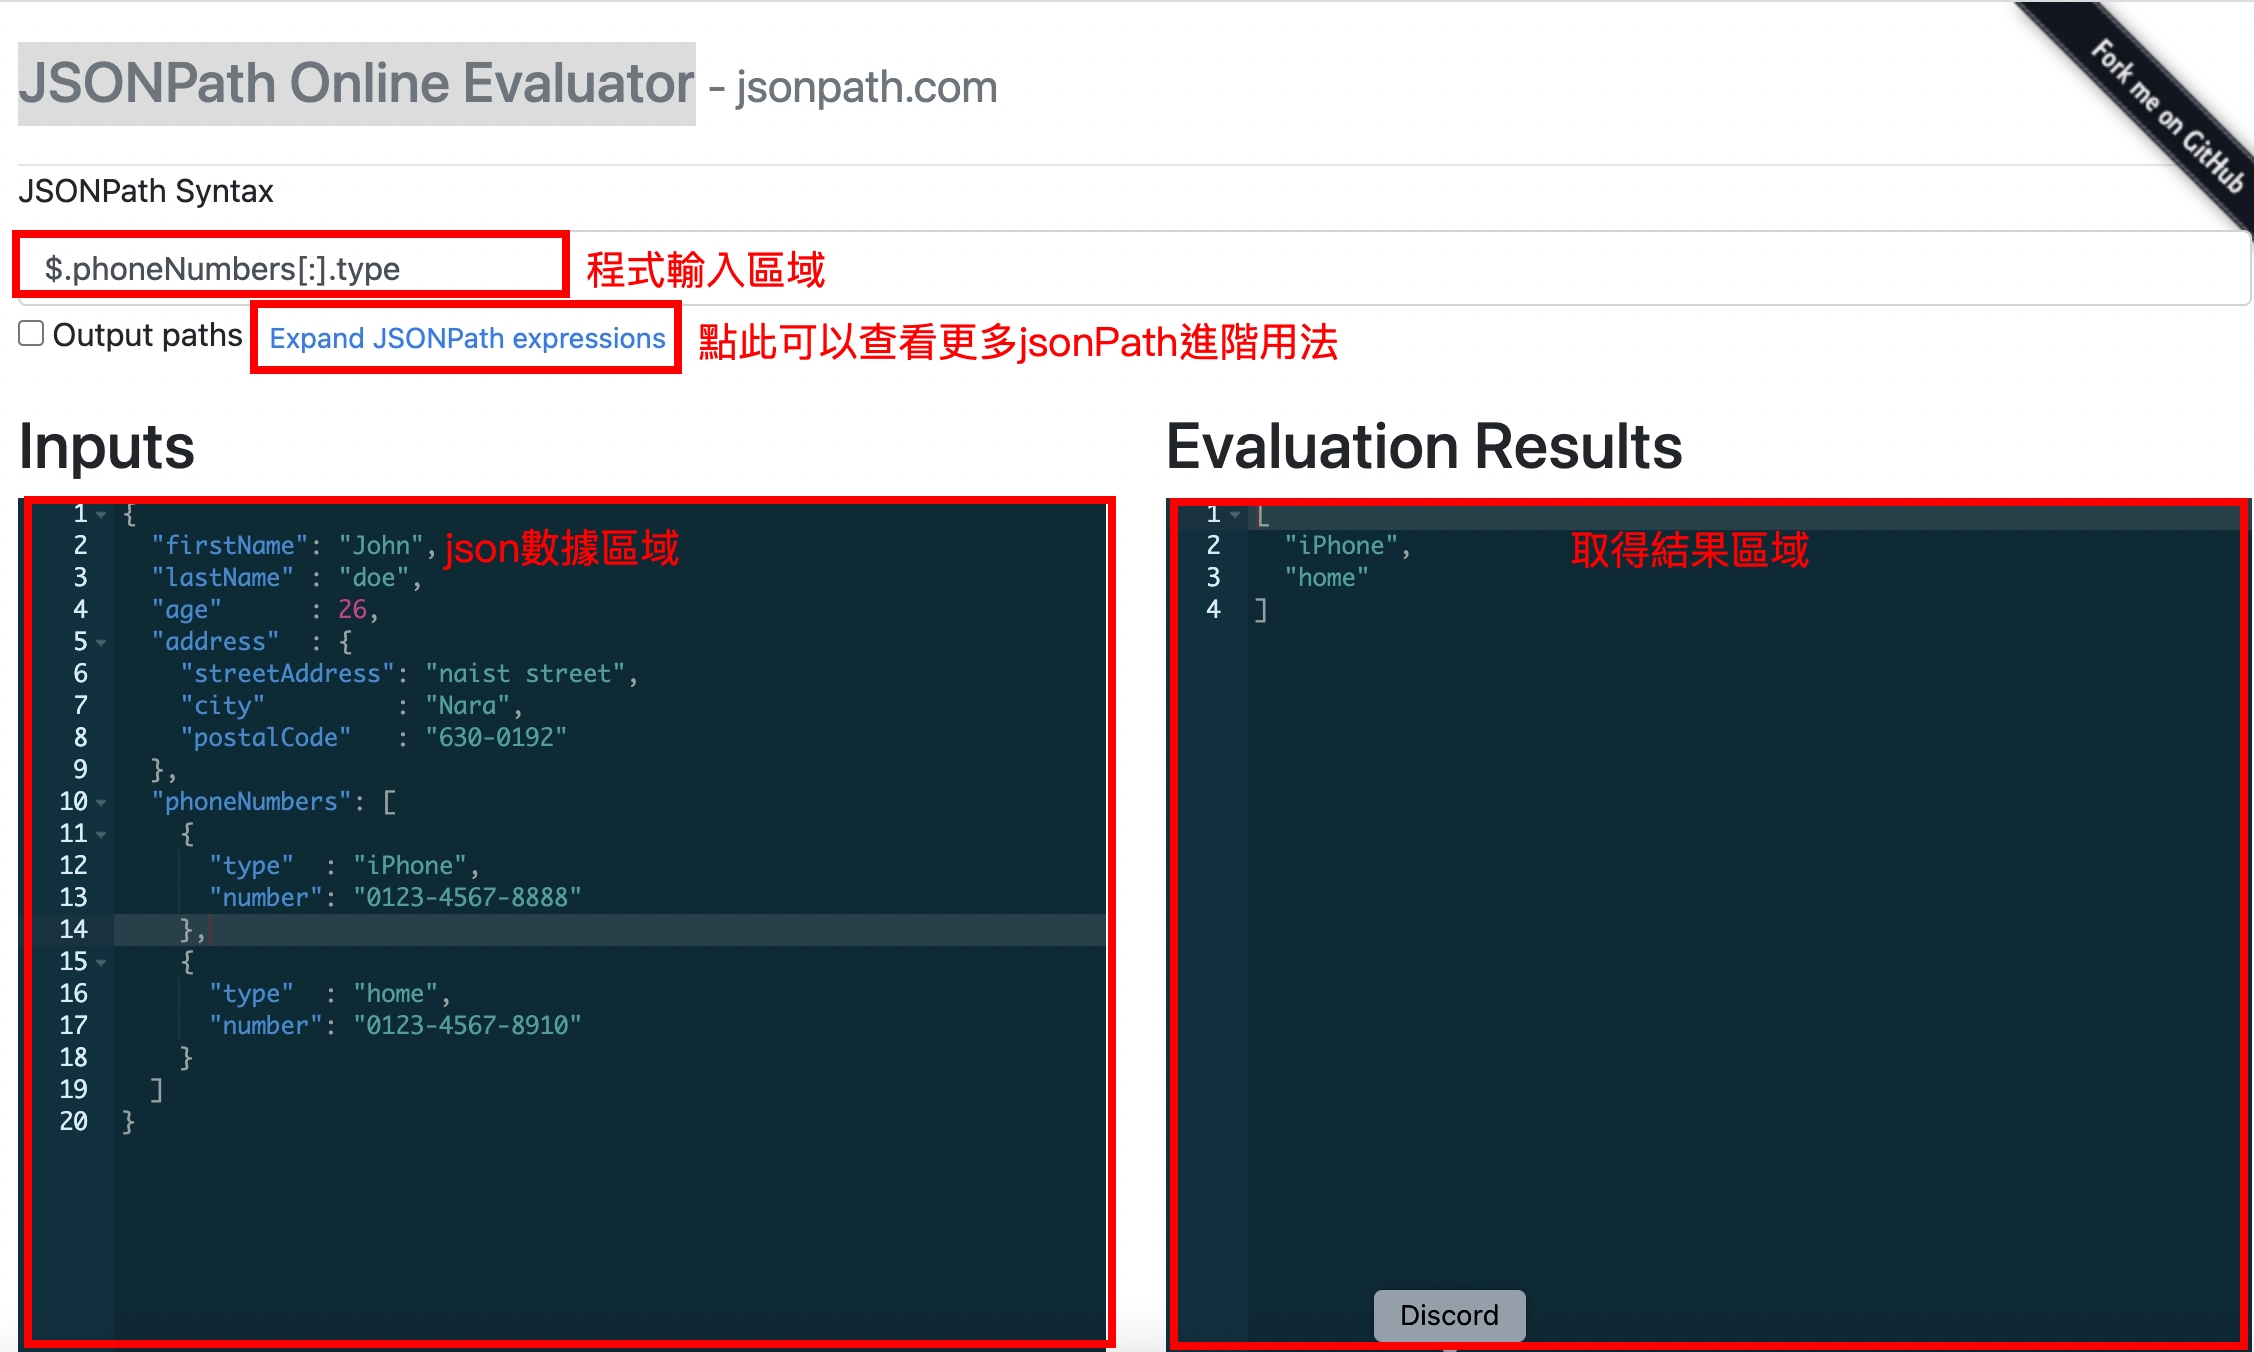
其中特別的是第一個參數,他設計了使用者如果要使用的話,要用代表最外層json object的"$“符號,還有「.」符號來取的我們想要的數據。 那對於jsonPath的這種方式,這邊提供了
jsonpath練習網站-JSONPath Online Evaluator
來幫助我們練習,這個網站叫做JSONPath Online Evaluator,使用方式很簡單,如下圖:
.andDo()
其實在撰寫jsonpath時,要一邊撰寫jsonpath時還要一邊查看json數據其實是有點麻煩的事情,因為在測時前要先去的json數據,所以我們可以透過.andDo先來輸出.perform的API執行結果當執行測試單元時,其中會長這樣:
部分java程式碼:
public void getById() throws Exception{

    RequestBuilder requestBuilder = MockMvcRequestBuilders
            .get("/students/3");
    mockMvc.perform(requestBuilder)
            //當在.perform下面使用.andDo的時候,就可以輸出這個API的執行結果
            .andDo(print())
            .andExpect(status().is(200))
            /*這邊的equal使用萬用鍵的方式import static method之後在選擇Machers.equalTo
            第一個就是想要取得json object的key,
            $的意思就是最外層的json object
            「.」就是所謂的"的"
            */
            .andExpect(jsonPath("$.id",equalTo(3)))
            .andExpect(jsonPath("$.name",notNullValue()));
}
部分console:
在console裏面首先可看到MockHttpServletRequest寫著http request的資訊,
再來下面的MockHttpServletResponse資訊裡,就是程式裡面運行的結果, 也可以看到在Body裡面有返回的json格式結果,在撰寫json時效率就能稍微高一些些。
MockHttpServletRequest:
      HTTP Method = GET
      Request URI = /students/3
       Parameters = {}
          Headers = []
             Body = null
    Session Attrs = {}

Handler:
             Type = com.example.demo.controller.StudentController
           Method = com.example.demo.controller.StudentController#read(Integer)

Async:
    Async started = false
     Async result = null

Resolved Exception:
             Type = null

ModelAndView:
        View name = null
             View = null
            Model = null

FlashMap:
       Attributes = null

MockHttpServletResponse:
           Status = 200
    Error message = null
          Headers = [Content-Type:"application/json"]
     Content type = application/json
             Body = {"id":3,"name":"Judy","score":100.0,"graduate":true,"createDate":"2021-09-05T04:19:48.000+00:00"}
    Forwarded URL = null
   Redirected URL = null
          Cookies = []
.andReturn
在上面.andDo()的程式裡面,還可以透過andReturn來驗證結果,但他只能加在最後一行,他的用途是取得完整的API執行結果出來,一般在比較複雜的test case才會使用,不然在except加上jsonpath就夠用了,所以我們將上面的程式碼改版後會變成這樣:
@Test
public void getById() throws Exception{

    RequestBuilder requestBuilder = MockMvcRequestBuilders
            .get("/students/3");
		//下面這行有改變,使用了MvcResult,可以去對照andDo看看有什麼不同
    MvcResult mvcResult=mockMvc.perform(requestBuilder)
            .andDo(print())
            .andExpect(status().is(200))
            .andExpect(jsonPath("$.id",equalTo(3)))
            .andExpect(jsonPath("$.name",notNullValue()))
            .andReturn();

    //使用mvcResult取得responseBody資訊
    String body =mvcResult.getResponse().getContentAsString();
    //顯示
    System.out.println("返回的responseBody為:"+ body);

}
MockMvc POST方法
上面示範了使用MockMvc來寫出GET方法的http request, 接下來要學習使用POST,用程式碼來解說
@Test
public void create() throws Exception{
    RequestBuilder requestBuilder = MockMvcRequestBuilders
            .post("/students")
    //到上面都跟get幾乎一樣
    //下面很重要,一定要加上下面這行才可以在requestBody才可以傳遞json參數
            .contentType(MediaType.APPLICATION_JSON);
            //想在request Body的json字串
            //.content(.....)
    //執行
    mockMvc.perform(requestBuilder)
            //查看創建的API的成功http狀態碼決定
            .andExpect(status().is(201));
}
Github
本範例皆由hahow古老師的課程學習,範例也是,